DIY - How to make your own pocket monkii + monkii bars 2
Our number one goal here at monkii.co isn’t to sell monkii bars – it’s to inspire people to live wild. So when we started hearing that a small number of people thought our products were too expensive and that they could make them on their own for much less, we decided to help them. So whether you buy from us, or make your own, it’s time to get wild.
Disclaimer
We did not make these tutorials - they were made by normal people who may or may not have engineering, manufacturing, or technical backgrounds. Follow this tutorial at your own risk. We can’t speak to the strength nor safety of anything you make. Use common sense - following this tutorial and using the device could be dangerous.
SKIP TO: POCKET MONKII || MB2 || MINIMALIST
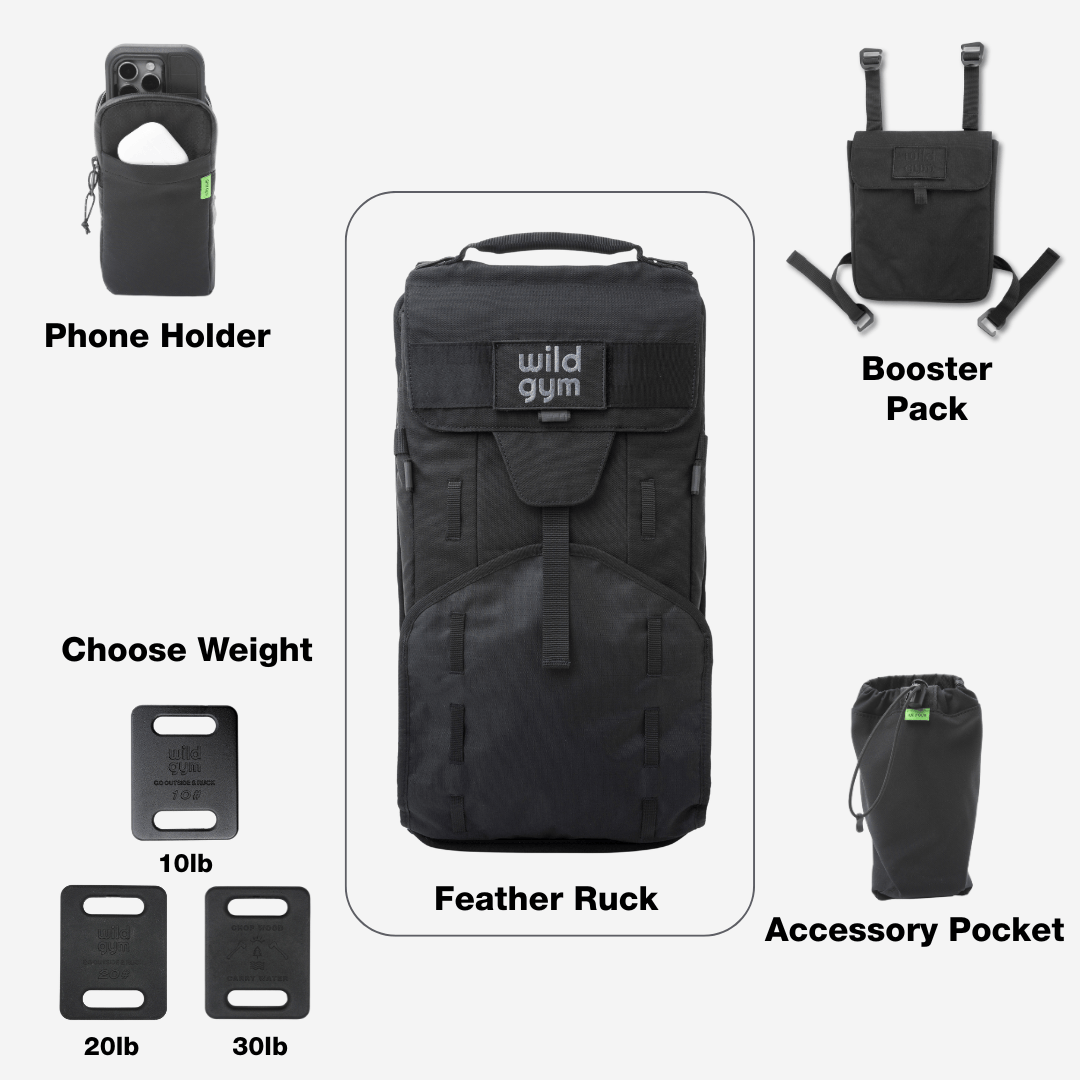
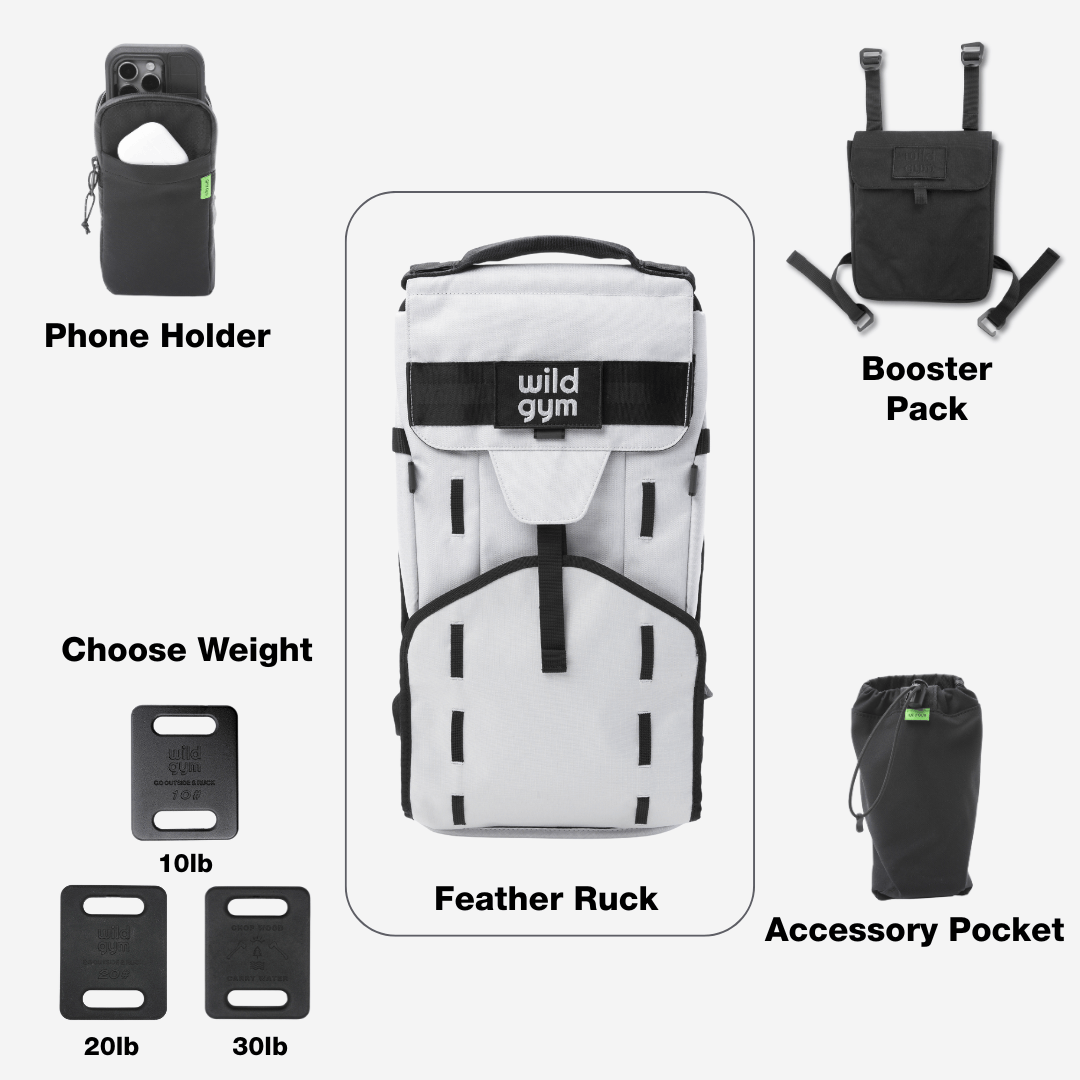
pocket monkii DIY ($25)
Step by step video guide:
Step 1: Materials and Tools
Here's what you'll need to get to make your own Pocket Monkii
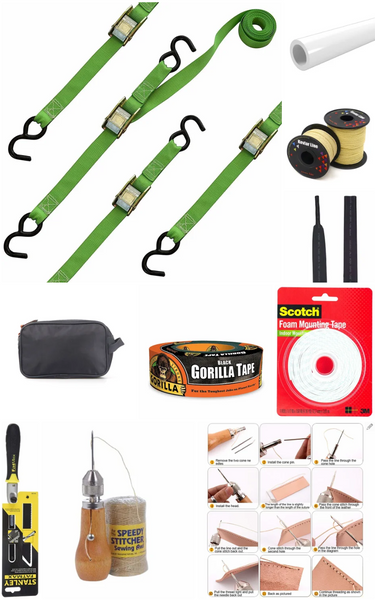
Materials
- 2 -10' Cam Buckle Tie Downs
- Rated to hold at least your own body weight
- 12-18"- PVC Pipe
- I used 3/4" diameter, but you can use whatever you like to fit your hands
- 3 Lengths of 4-6" pipe depending on the width of your closed hand
- Thin Kevlar String for sewing
- 3 - 2" pieces Heat Shrink Tube
- Use 1" diameter Heat Shrink with a 3:1 shrink ratio
- Small Carrying Case
- I used a toiletry dopp bag
- Gorilla Tape (for grip)
- Foam Mounting tape (for cushion on the door anchor)
Tools
- Scissors/Utility knife
- Hacksaw
- Heavy Duty sewing device (Stitching Awl, sewing machine, Sail needle, etc.)
- Heat gun or lighter
- Super Glue
Most items can be found at a hardware store and/or dollar store. All in all I spent about $25 on these materials.
Step 2: Design
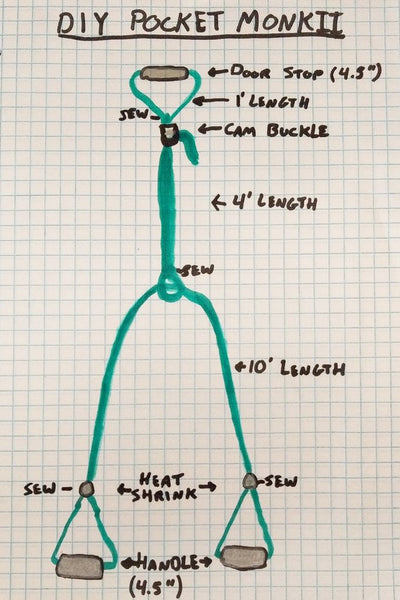
Layout
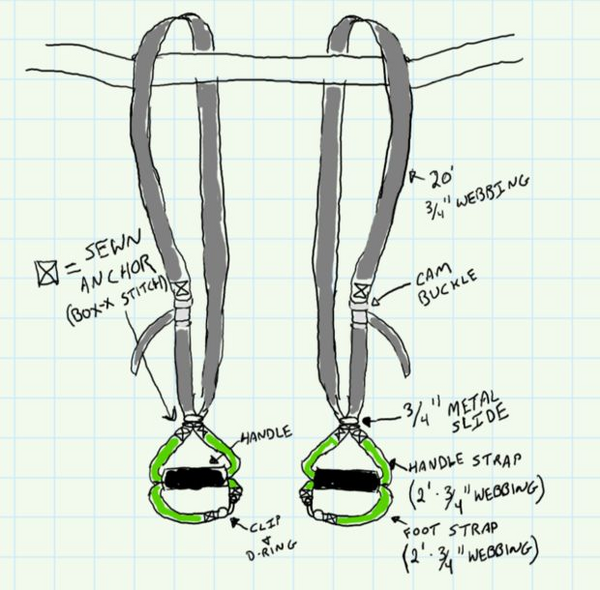
The design of the Pocket Monkii is fairly simple. It consists of three lengths of nylon webbing from the tie-down straps. The first is roughly one foot long, and will go through the padded door stop and be secured to the anchor end of the cam buckle. Through the adjustable end of the cam buckle will be another length of webbing, which will be a four feet in length and have a small loop sewn on the end. Through this loop will be last length of webbing, which will be about 10 feet in length. On either end of this strap is a "Lower Triangle."
Lower Triangle
The Lower Triangle will is made by running the end of the strap through a handle, then securing the end back onto the strap. The lower triangle will be roughly 18 inches of webbing.
Sewing
There will be four sewn joints: One on each Lower Triangle, one to create the loop on the adjustable strap, and one to close the fasten the door stop strap together. Each sewn joint will be sewn in a "Box X" pattern, which is just a box with an X inside. This is a very secure stitch that will prevent any slipping or pulling apart of the webbing. Each joint (except for the door stop strap) will be secured further with a bit of heat shrink tubing. This will protect the stitching and make everything look a bit better too.
Step 3: Process - Cut, Sew, Shrink
Handles/Door Stop
Cut the PVC into three lengths using a hacksaw. These should be cut to just slightly longer than the width of your closed hand. For me it was about 4.5". Two will be handles, and one will be the door stop. Use a utility knife to fillet out the inside edges of the ends of each piece; this will prevent rubbing and abrasion of the straps on those corners. Wrap the handles in a layer of Gorilla Tape. I find that Gorilla Tape works best, as it's extremely durable and offers a nice grip on the handles. Wrap a couple layers of foam tape on the door anchor, then wrap a layer of Gorilla Tape over top of that. This combination adds a good about of protection for the door and creates a friction "bite" on the door that will prevent any slipping while moving around and exercising.

Straps
Measure out and cut your 10', 4', and 1' lengths of strap. Cut off any tags or hooks attached to the straps when you got them, you just want strap material. When you make a cut, burn the edge of the strap immediately to prevent fraying; just take a flame to the end and just make sure you see a line of melted nylon form across the edge.
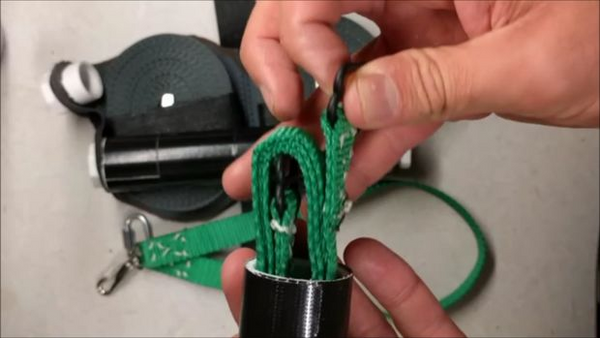
Thread two handles and two pieces of heat shrink through the 10' strap, slide a piece of heat shrink on the 4' strap, and slide the "anchor" end of the cam buckle and the door stop through the 1' piece.
Sew
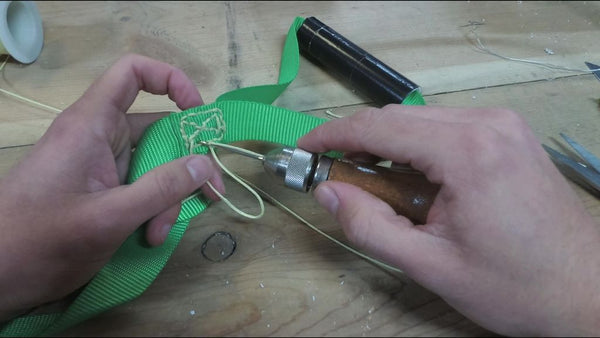
Create a Lower Triangle on one end of the 10' strap by setting a handle approximately six inches from the end of the strap, then bringing the strap end to the rest of the strap about six inches above the other end of the handle (see picture) Secure the strap end to the other side of the strap with a Box X stitch. Create a Lower triangle on the other end of the 10' strap in the same way
Create a small loop (about 3 inches in diameter) on one end of the 4' strap. Secure this loop with another Box X stitch. The other end of this strap will feed through the cam buckle (see picture)
On the 1' strap with the cam buckle and door stop, simply sew the ends of the strap together with another Box X stitch to close the loop. When complete, slide the stitched joint into the body of the door stop to hide it.
Shrink
Slide a piece of heat shrink over the stitches on the Lower Triangles and small loop. Shrink it down by applying even heat with a heat gun or lighter/torch from a distance. Be careful not to burn yourself or damage the straps or stitches.
You should now have three separate pieces:
- The 10' strap with a Lower Triangle on either end
- The 4' strap with a loop on the end
- The 1' strap with the door stop and cam buckle
Step 4: Assembly, Storage and Setup
Assembly
Feed the 4' strap end (without the loop) through the back of the cam of the cam buckle, and pull the end through to your desired length. Feed the 10' strap through the loop on the 4' strap so that the loop bisects the 10' strap, and the Lower Triangles hang evenly when holding the whole system by the door stop.

Storage
This system is fairly tangle-proof, as there is much less hardware and strap material flying around. You won't have to wind the straps or disassemble anything; the whole thing can be stuffed into the case of your choosing. I chose to go with a toiletry/Dopp bag, as it just fits with the travel theme of this system. You can use something like a pencil case or Nalgene bottle, or just fold the straps up and wrap an elastic around the handles or something, you can't really go wrong here.

Door Setup
IMPORTANT: Make sure you are setting up on a door that opens away from you, in this way the force you apply on the Pocket Monkii will be pulling the door into the door jamb, and not into the open position.
Simply open the door, place the door stop at the top of the door on the side opposite from you, then close the door (see picture). Adjust the height of the handles by adjusting the strap going through cam buckle.

Bar/Branch Setup
Wrap the anchor strap around the bar or branch and feed the straps through the loop of the anchor strap, tying the system in a Girth Hitch around the bar. Pull it tight, adjust the cam buckle strap, and you're good to go!

monkii bars 2 DIY ($40)
by JakeOfAllTrades
Step by step video guide:
Step 1: Understand What You Are Building
Do your research on what the product is and isn't. Check out their videos, website, and awesome free training app. monkii bars 2 is a complete suspension system for improving your flexibility, mobility, strength, and endurance. Understand how the product is used and that will help guide you while building your own.


(make sure they can fit inside the PVC pipe)


monkii bars Minimalist ($15)
DIY by GarageGymReviews.com
In this tutorial I’m going to show you how to build your own Monkii Bars that can be taken anywhere and are virtually indestructible. This is also, one of the easier DIY projects I’ve ever done for such a useful piece of equipment
The problem for many people however is pretty simple, they don’t want to pay for them. Sure they have what some would view as a pretty hefty price tag, BUT the quality of Monkii Bars is unlike anything you can make out of things you get out of the hardware store.
Although you won’t have the quality of the Monkii Bars on something you build yourself, you can have most of the same features and functionality, in what is essentially, just an uglier format.
Let’s begin…
Supplies
- One 1” at least 2 ft. long piece of PVC Pipe
- 24 ft. of 550 Paracord
- Four 1” PVC Caps
- Two Stainless Steel Chain Quick Link’s
Tools
- Miter Saw (Alternatives: Hack Saw, Hand Saw, etc.)
- Scissors/Knife
- Lighter
- Tape Measure/Ruler
Instructions
- Measure out two 7 ½” sections of your 1” PVC Pipe and make a mark.
- Cut the PVC pipe along your line using a Miter Saw/Hand Saw/whatever you have that cuts things. (PVC pipe is pretty easy to cut so if you had the fortitude, in reality you could do this with a pocket knife.)
- Grab your paracord, measure out 12 ft. and make a cut with your scissors/knife.
- Using a lighter/match burn all four ends of your paracord lines to keep them from fraying.
- Thread your paracord through one of the Stainless Steel Chain Quick Link’s and tie an Overhand Bow using both ends of the cord. Repeat with the other line of paracord and quick link.
- Wrap up one of your paracord’s and quick links, place inside of your PVC pipe, and place your caps on. Repeat with the other pipe, cord, and caps.
- That’s it!
Total Cost: ~$15-$20
How to use:
- Uncap the handles and place caps to the side.
- Throw your carabiner and paracord over a horizontal support. (ex: field goal, tree, pullup bar, etc.)
- Thread the carabiner through the PVC pipe.
- Tie your untied piece of paracord to the carabiner using a knot of your choice. There are many that can be used, I personally prefer the Buntline Hitch or the Double Overhand knot. If you’re unsure which one, or how to tie them, simply Google them for many different tutorials and options.
- Repeat for the other handle.
The problem in this is ensuring that the handles are at the same height. This will take some time to figure out in the beginning, but after you’ve done it a few times, it becomes pretty easy.
Final Thoughts
monkii bars are an awesome tool for those that like to train in the outdoors. There’s something really fun about hitting a trail with monkii bars in hand and knowing at anytime you can set up a station for pullups, dips, and whatever else you want to do.
This is such a cheap and easy DIY, there’s little reason to not make them. I think they’re perfect for anyone who travels a lot or likes going on trail runs.
Give it a shot, and more importantly, get outside of the gym more. This is the perfect tool to help you do so.
Stay Strong, Live Long,
FAQ
Use this text to share information about your product or shipping policies.
What is rucking in one sentence?
Rucking is walking a set time or distance while carrying weight in a backpack.
Is rucking just hiking?
It’s related. Hiking is usually trails, terrain, and gear. Rucking is defined by the added weight, and it can be done anywhere, sidewalks included.
Do I need a special rucking backpack?
No. You can start with any backpack. But if you want it to be comfortable and scalable, a ruck with stable weight placement is a game-changer.
How much weight should I start with?
Wild Gym recommends 10–20 lb, with a simple rule: over 150 lb start at 20; under 150 start at 10.
How often should beginners ruck?
Start “a few times per week.” Wild Gym suggests starting with rucking a few times per week and building from there.
How long should a beginner ruck be?
Start with 20–30 minutes. Add time before you add a bunch of weight.
What pace should I ruck?
Brisk but controlled. You should be able to speak in sentences. If you’re redlining, it’s too heavy or too fast.
Does rucking build muscle?
It builds strength endurance and “carry strength.” If you want more muscle and bone stimulus, pair rucking with 2–3 simple strength sessions per week.
Is rucking safe for knees?
For many people it’s lower impact than running, but it’s not immune to overuse if you ramp too fast. Start light, keep the load stable, and avoid steep hills early.
What’s the best way to start if I’m totally out of shape?
Start with walking first. WebMD suggests you should be able to walk about 30 minutes comfortably before adding load. Then add 10 pounds and keep it short.
Featured collection